
Next Steps
Frontend (1 day)
- Complete the frontend integration first. The code blocks below include credentials that you can use to get started right away.
- After adding the code below to your app, Lendica's iBranch widget will be fully functional in a demo mode.
- The demo mode will provide full iBranch testing functionality:
- Viewing preview PayLater/FundNow offers
- Going through an application
- With the frontend in place, your development work is nearly done.
- After our backend integration is complete, the app will use live data automatically.
Backend (1-2 weeks)
- Provide Lendica with a demo account on your platform
- Lendica will use this period to test the API integration and ensure that all necessary data is shared accurately and securely
Frontend Integration
Insert the following script tag in your application to access the Lendica iBranch widget:
<script src="https://static-idev.golendica.com/v2/lendica.js"></script>
With the script tag added to your codebase, you'll have access to Lendica's full iBranch functionality.
Below are some credentials that you can use to begin testing the frontend in minutes:
| Parameter | Type | Description | Example |
|---|---|---|---|
partner_name | string | The name of the partner service - you will receive this from Lendica during onboarding | 'partner_dev', 'partner' |
partner_company_uuid | string | The unique ID of the currently logged in company in the partner system | '12345' |
company_name | string | The name of the company currently logged in | 'DemoCo' |
credentials = {
  partner_name: "<<partner_name>>", // replace with partner name received in your registration email
  partner_company_uuid: "12345", // replace with company ID
  company_name: "DemoCo" // replace with company Name
};

// Init with credentials
lendica.init(credentials).then(() => {
  lendica.ibranch.render();
});
Key Terms and Concepts
To ensure clarity and prevent misunderstandings, here are definitions for some key terms used throughout this documentation:
-
partner_name:- This is the unique identifier for the partner platform (i.e., your company) in Lendica's system.
- It is provided by Lendica during the onboarding process.
- Example: If your company is called "AcmeERP", your
partner_namemight be "acme_erp". - For testing purposes, Lendica will create an additional
partner_name(e.g., "acme_erp_dev") that connects to your development environment, allowing you to safely test the integration without affecting production data.
-
partner_company_uuid:- This is the unique identifier for a specific company (user) within the partner's system.
- It is generated and maintained by the partner (you), not by Lendica.
- This should remain consistent for a given company across all API calls.
- Example: If a company "XYZ Corp" is using your platform, you might have assigned them a UUID like "abc123-xyz789".
-
company_name:- This is the actual name of the company (user) that is logged into the partner system.
- It should match the official registered name of the company.
- Example: "XYZ Corporation Ltd."
It's important to note that the company details (partner_company_uuid and company_name) refer to the end-user company that is logged into the partner system, not the partner company itself. The partner_company_uuid is how you, as the partner, uniquely identify this company in your database.
Common Misconceptions
- The
partner_namerefers to your company (the partner integrating with Lendica), whilecompany_namerefers to your customer's company. - The
partner_company_uuidis not provided by Lendica; it's your unique identifier for the company in your system.
Understanding these distinctions is crucial for a successful integration and proper data flow between your system and Lendica.
Open a bill in PayLater
With the above code implemented, add this function to a button in the bill table. Calling this function will fetch the bill and open iBranch to start the PayLater flow.
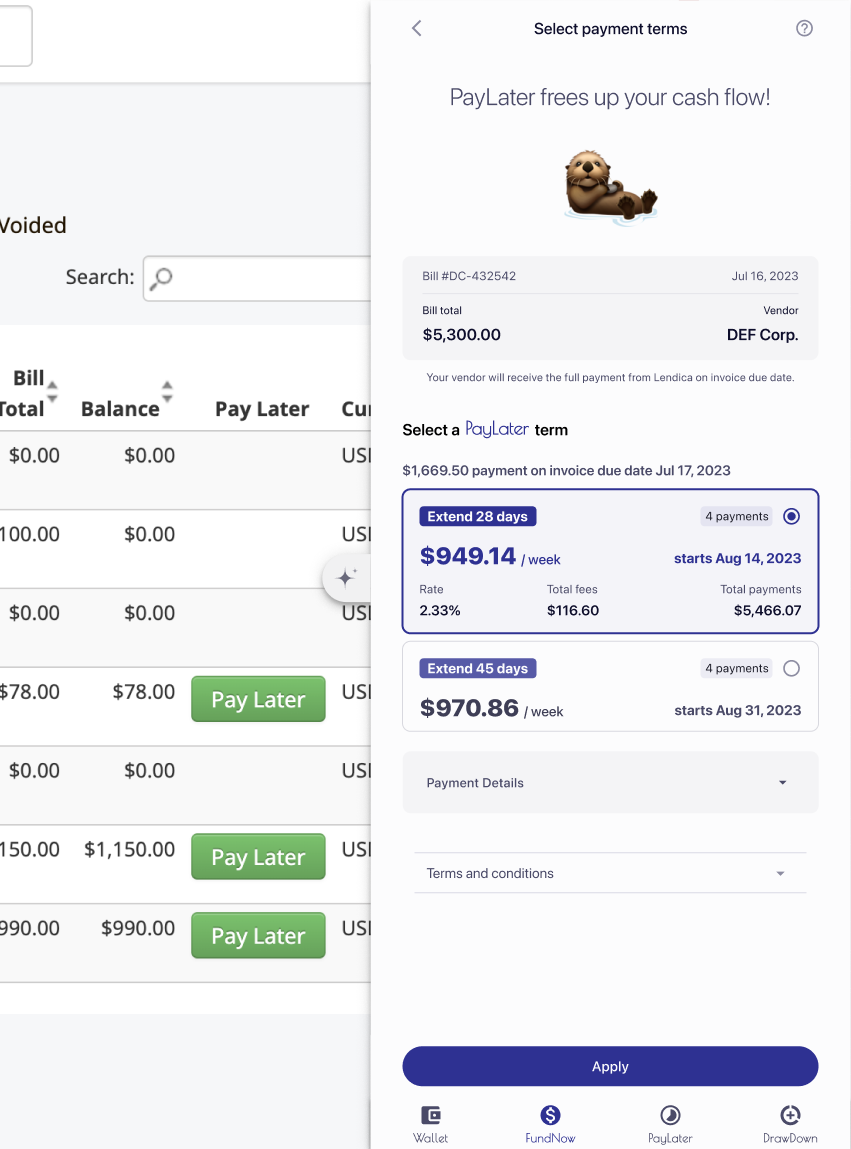
When the PayLater button is installed properly, clicking it should open a screen like this.
lendica.ibranch.openPayLater(
 partner_bill_uuid="B0001", // Replace with bill ID
 total=1000 // Replace with bill total
);
Open an invoice in FundNow
Add this function to a button in the invoice table. Calling this function will fetch the invoice and open iBranch to start the FundNow flow.
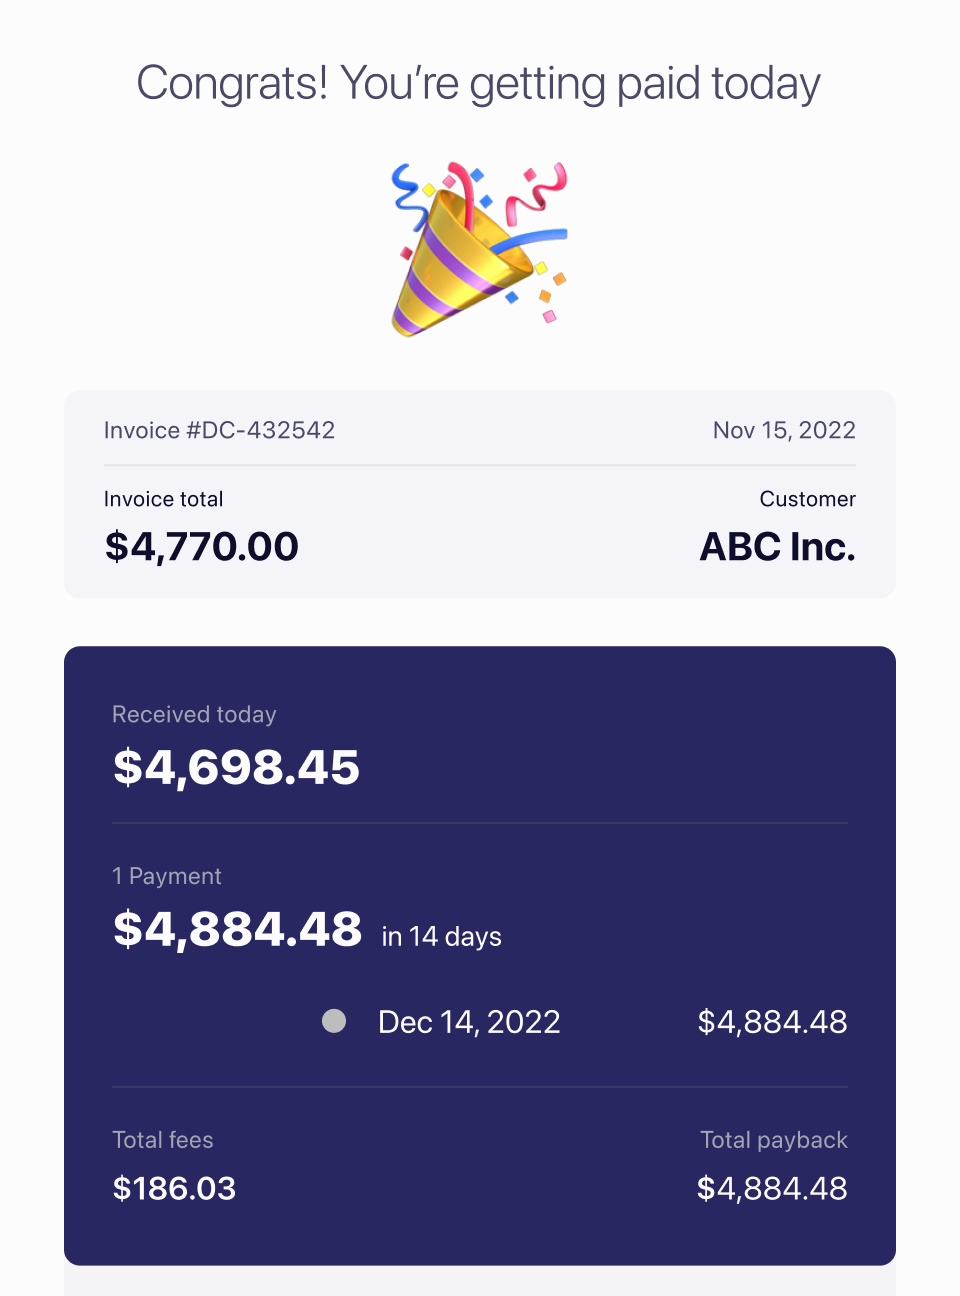
When the FundNow button is installed properly, clicking it should open a screen like this.
lendica.ibranch.openFundNow(
 partner_invoice_uuid="I0001", // Replace with invoice ID
 total=1000 // Replace with invoice total
);
Backend Integration
What we need
Demo Account:
Partner systems should create a demo account for Lendica on a sandbox server to test the integration.
The account created for Lendica should have a company_name and partner_company_uuid that Lendica can use to initialize the company in our system. Lendica should also be able to create an invoice to test the checkout feature with.
Partner API Authentication
Objective:
Lendica requires access to partner APIs to retrieve invoice and company data. To ensure secure and relevant data retrieval, we propose the creation of a dedicated authentication endpoint.
Action Steps:
- Set Up Authentication Endpoint:
- Purpose: This endpoint will allow Lendica to obtain a company-specific API token for data requests.
- Endpoint Format:
GET https://api.partner.com/company/token?company_id={partner_company_uuid}
Where{partner_company_uuid}is the unique identifier of the company in your system. - Security: Ensure this endpoint is authenticated. We recommend providing Lendica with an API key or another robust authentication method.
- Data Retrieval Endpoints:
- Lendica will adapt its backend to interface seamlessly with your existing APIs.
- Required Access:
- Bill Data: Details of individual bills and a comprehensive list of all bills for a company.
- Invoice Data: Access to both individual invoice details and a list of all invoices for a specific company.
- Company Profile: Information about the company, including its name, ID, license numbers, and other pertinent details.
Why This Is Important:
The API token obtained from the authentication endpoint will act as a secure key, allowing Lendica to interface with your system. With this token, Lendica can fetch essential data like invoices, bills, and company profiles, ensuring a seamless integration and user experience.
By following these steps, you'll facilitate a secure and efficient data exchange between Lendica and your platform. Should you need further details or assistance to implement this endpoint and grant API access, please don't hesitate to reach out. We're dedicated to ensuring a smooth and efficient integration process.